
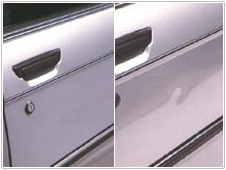
 PDR Technology stands for Paintless Dent Removal. This technology was born in the USA and Germany thanks to the invention of the new flexible paint for cars. Flexible and still strong coating is preserved even when the metal of the car is damaged and this allows to remove the dent on the car without repainting the whole part of it.
This technology is very convenient, economic and profitable. As soon as it appeared, it changed completely the concept of body shop repair, which requires much more efforts, time and most important – money!
The difference between standard body shop repair and PDR technology
When using PDR Technology:
1. You don’t need to repaint the part of the car, as the original paint is preserved.
2. You don’t need to dismantle or dismount the parts of the car
3. You don’t need to use the filler (usually), abrasive materials and other chemicals
4. The cost of such repair depends on many things but the final price is at least 2-3 times lower than standard body shop repair with painting.
How this innovative technology works?

Due to the appearance of such instrument the worker do not need to dismantle the car any more!
The process of removing the dent consists of several important steps:
1. The worker determines the position of the dent, the way he can reach it and also on the request of the customer estimates the approximate price of such repair.
2. The worker picks up the suitable instrument for this kind of job, fits the light and starts working with the dent.
3. An average repair takes 15-30 minutes. After finishing the removal of the dent, the worker fixes the possible defects if any, and returns the car to the customer.
15-30 minutes all in all and the dent is away as if never to be there before. What is more: both you and your customer are satisfied!
But! With this easiness and quickness one should bare in mind that it is not always possible to do such kind of repair.
Firstly, this technology is applicable only in case when the paint of the car is not damaged. Otherwise after removing the dent you will still need to do the spot repair ( it is possible with the system C from HBC System) and renovate the paint locally.
Secondly, when the metal is damaged hardly you won’t be able to remove the dent leaving no trace, because the metal is stretched and its surplus will be visible anyway.
 Thirdly, it is not recommended to fix the dents on the cars that have the paint coating of poor quality, for example some cars more than 15 years old, and also the cars that were repainted in the body shop before.
Nevertheless you have a lot of potential customers, as the amount of cars on the roads is growing unceasingly and nobody is secured from some accidents on the roads as well as from the whims of nature, for example hale.
This technology appeared on the Ukrainian market not so long ago and grows in popularity very rapidly. It is a source of profit for private entrepreneurs, who wish to start their own business. This business doesn’t require huge investments. You invest money only in good instruments, but your major investment is your time, desire and skills.
This technology also attracts the attention of the professionals, who deal with selling used cars, as dealer centers. The question of removing the dents from the car spending little time and money is more than urgent for them.
The choice of the tools
Answering the question “What is the most important in working with this technology?” the professionals will say for sure that it is the level of the worker’s skills combined with the good and qualitative instrument.
The choice of the tools is a very important step. The main criteria that one should keep in mind while selecting the tools are described here.
The material
 The material from which the tools are made is very important. It reflects on the price, quality and durability of the tools. The tools can be made of ordinary steel (that normally rusts), chromed and made of rustless steel. The instrument made of ordinary steel is, of coarse, cheaper, but it won’t serve for a long time, what is more you will have to leave aside the expensive cars, and it is these cars, that are your potential customers.
The PDR tools made by Danish company HBC System are made of rustless steel that on the final stage is polished and the instruments acquires the nice and shiny look, that is preserved for many years unlike the chromed instrument that looks nice only when you buy it. HBC System produces the tools from high-carbonate steel and this instrument has been tested for hundred times by workers and also metal laboratories. HBC has the homologations from the car producers all around the world, such companies as Mercedes and Porsche already made their choice in favour of HBC System.
Quality
 Except the material the process of producing the tools is very important too. The tools produced by HBC System undergo 3 stages of heat treatment. The points of the instruments are forged and do not distort with the years of usage. Very important is that the middle part of the instrument only bends but do not twists. Because the worker works from the inside of the car he doesn’t see directly where and how hard he pushes, that is why it is so important that the tool works as the continuation of his hand and reproduces the efforts the worker makes.. When the instrument twists in the middle it is very difficult to control it, there is a danger to push too hard or at the wrong place and to spoil all the work done. If you made your mind to work with this technology start with the quality of the instrument.
Sets of instruments
While choosing the instrument one should remember that a universal kit doesn’t exist. In the process of working everyone finds his own tool, which he likes. All the PDR tools proposed by HBC System can be generally subdivided into 2 kinds: main and special. Main tools are the tools that are invented to deal with the most common types of dents and to solve the most common problems. At the same time the special tools are created to help you in more problematic cases where the main tools are not the thing you need. More description you will find in this catalogue.
Cost of the tools