
SMART REPAIR BY HBC - the perfect start to an excellent finish
Wednesday, June 13, 2012
Thursday, April 12, 2012
HBC SYSTEM Magnetic PDR Roll Tip kit

HBC SYSTEM Magnetic PDR Roll Tip kit
Instructions for use
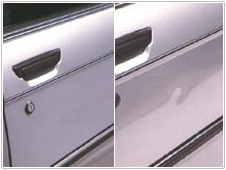
1. Highlighting the dent with a line board
The line board highlights a dent or a high spot by deviation of its reflected lines.
The line board is optional.
To attach the line board first ensure the area is smooth and clean. Whilst pushing the rubber base flat against the point at which it will best reflect the dent, clip the movable suction cup handle down to lock the lineboard base to the panel. (First move the line board’s reflective board about until you get a clear reflection of parallel, black and white lines with a deviation of the pattern ie the dent, toward the centre of the reflection. A dent will be reflected as a widening of the lines and a high spot as a narrowing of the lines)
HIGHLIGHT THE DENT WITH THE LINEBOARD
SEPARATED/SWOLLEN LINES MEANS DENT (LOW)
SQUEEZED LINES MEANS HIGH SPOT
2. Select the bar, tip and extension combination that will allow the best access to the inside of the dented panel. Select tip size according to access available and panel gauge. 19mm Magnet PDR tip tool picks us trace better than 15mm in thicker gauge panels though due to size, will not access all desired areas. It may be necessary to remove trim, light fittings or gain access to a roof by dropping a corner of the headlining.
SELECT SUITABLE TOOL SHAPE AND EXTENSION COMBINATION
3. Use of the door bar
The black foam handled “U” shaped bar is designed to access door skins. Screw on the 15mm Magnet PDR tip tool, wind down window fully, separate glass from outer door skin by pushing the window wedge between them in the middle of the door, where flexibility is greatest. With wedge in place, introduce bar and tip as close to the wedge as possible with tip lying horizontal, ie at the tip’s narrowest dimension, to the opening made by the wedge.
It may be necessary to remove the exterior rubber or plastic horizontal window seal by sliding and or unclipping, to gain better access to the interior.
USE “U” SHAPED BAR FOR DOORS
4. Use of the two straight, red-handled bars. These are designed for panels such as wings, roofs, bonnets and bootlids.
USE STRAIGHT BARS FOR OTHER AREAS
5. Leverage points
Once the tool has been introduced and is in the dent area locate a suitable panel hole in which to hang the “S” hook so that the bar with “O” ring slid over can be hung on the “S” hook to create a leverage point when pushing the bar in the dent area.
It is not always possible to locate a suitable place from which to hang the “S” hook, in which case lever against any part of the surrounding body work which is strong enough, first protecting paintwork etc with suitable padding.
LOCATE LEVERAGE POINT FROM WHICH TO HANG “S” HOOK
6. Surface trace pick up.
Once bar is adequately levered (in the case of the door bar leverage is against the glass, so no further leverage point is necessary, neither are “S” hooks nor “O” rings), offer a surface trace ball to the dented area, moving it around with the fingertips until it is picked up by the tip. Once picked up, slowly slide the tip around by moving the handle until you are comfortable with the movements.
INTRODUCE BAR TO INSIDE OF PANEL IN DENTED AREA
OFFER SURFACE TRACE TO DENTED ARE UNTIL PICKED UP BY TIP
7. Pushing out a typical round dent/ding.
The dent should be pushed out slowly and with minimum pressure to avoid pushing the panel high (see tapping down), and risking the possibility of cracking the paint. Push down on the handle, causing downward pressure on the “S” hook and “O” ring, an upward pressure on the tip against the dent. The general rule is to imagine the dent is a clock face and, starting at one number, follow the order of numbers pushing once on each number until the circle has been completed. You should now see that the dent has decreased in size. It is important to keep the dent regular by maintaining the same pressure for each push and keeping to the circular pattern.
Next move in toward the centre slightly, and repeat. Continue in decreasing concentric circles until the dent has dissappeared or you are left with just the centre. If left with the centre, depending o the depth you may need to push the centre out high before tapping down to finish.
IMAGINE DENT AS A CLOCK FACE. FOLLOW SEQUENCE OF NUMBERS UNTIL CIRCLE IS COMPLETED.
MOVE SLIGHTLY TOWARD CENTRE AND REPEAT.
PUSH SLOWLY AND EVENLY WITH MINIMUM PRESSURE
8. Tapping down.
If you push too hard or need to lift the centre pit of a deep dent, the panel’s metal will stand proud and you will have to tap down,
Using the nylon punch and hammer provided, and following the pinched lines on the lineboard , gradually tap down the highs created.
It is important that you tap down a high as soon as you create it otherwise irregularity will occur and confuse the dent’s reflection, making it much harder to read and so remove.
IF YOU GO HIGH, TAP DOWN BEFORE CONTINUING
9. Flatting and polishing.
After removing a dent the surface may appear “pock marked” from numerous pushes.
These can me removed by flatting with 2000 wet and dry, before polishing.
FLATTING AND POLISHING CAN REMOVE MINOR SURFACE IRREGULARITIES
10. Maintain Magnet PDR tip tool kit clean and lightly lubricated with oil, grease or vaseline.
MAINTAIN MAGNET ROLLER TIPS CLEAN AND LIGHLY LUBRICATED
SUMMARY
1. HIGHLIGHT THE DENT WITH THE LINEBOARD
SEPARATED/SWOLLEN LINES MEANS DENT (LOW)
SQUEEZED LINES MEANS HIGH SPOT
2. SELECT SUITABLE TOOL SHAPE, TIP SIZE AND EXTENSION COMBINATION
3. USE “U” SHAPED BAR FOR DOORS
4. USE STRAIGHT BARS FOR OTHER AREAS
5. LOCATE LEVERAGE POINT FROM WHICH TO HANG “S” HOOK
6. INTRODUCE BAR TO INSIDE OF PANEL IN DENTED AREA
OFFER SURFACE TRACE TO DENTED ARE UNTIL PICKED UP BY TIP
7. IMAGINE DENT AS A CLOCK FACE. FOLLOW SEQUENCE OF NUMBERS UNTIL CIRCLE IS COMPLETED.
MOVE SLIGHTLY TOWARD CENTRE AND REPEAT.
PUSH SLOWLY AND EVENLY WITH MINIMUM PRESSURE
8. IF YOU GO HIGH, TAP DOWN BEFORE CONTINUING
9. FLATTING AND POLISHING CAN REMOVE MINOR SURFACE IRREGULARITIES
10. MAINTAIN MRT TIPS CLEAN AND LIGHTLY LUBRICATED
Thursday, February 23, 2012
PDR Technology
 PDR Technology stands for Paintless Dent Removal. This technology was born in the USA and Germany thanks to the invention of the new flexible paint for cars. Flexible and still strong coating is preserved even when the metal of the car is damaged and this allows to remove the dent on the car without repainting the whole part of it.
This technology is very convenient, economic and profitable. As soon as it appeared, it changed completely the concept of body shop repair, which requires much more efforts, time and most important – money!
The difference between standard body shop repair and PDR technology
When using PDR Technology:
1. You don’t need to repaint the part of the car, as the original paint is preserved.
2. You don’t need to dismantle or dismount the parts of the car
3. You don’t need to use the filler (usually), abrasive materials and other chemicals
4. The cost of such repair depends on many things but the final price is at least 2-3 times lower than standard body shop repair with painting.
How this innovative technology works?

Due to the appearance of such instrument the worker do not need to dismantle the car any more!
The process of removing the dent consists of several important steps:
1. The worker determines the position of the dent, the way he can reach it and also on the request of the customer estimates the approximate price of such repair.
2. The worker picks up the suitable instrument for this kind of job, fits the light and starts working with the dent.
3. An average repair takes 15-30 minutes. After finishing the removal of the dent, the worker fixes the possible defects if any, and returns the car to the customer.
15-30 minutes all in all and the dent is away as if never to be there before. What is more: both you and your customer are satisfied!
But! With this easiness and quickness one should bare in mind that it is not always possible to do such kind of repair.
Firstly, this technology is applicable only in case when the paint of the car is not damaged. Otherwise after removing the dent you will still need to do the spot repair ( it is possible with the system C from HBC System) and renovate the paint locally.
Secondly, when the metal is damaged hardly you won’t be able to remove the dent leaving no trace, because the metal is stretched and its surplus will be visible anyway.
 Thirdly, it is not recommended to fix the dents on the cars that have the paint coating of poor quality, for example some cars more than 15 years old, and also the cars that were repainted in the body shop before.
Nevertheless you have a lot of potential customers, as the amount of cars on the roads is growing unceasingly and nobody is secured from some accidents on the roads as well as from the whims of nature, for example hale.
This technology appeared on the Ukrainian market not so long ago and grows in popularity very rapidly. It is a source of profit for private entrepreneurs, who wish to start their own business. This business doesn’t require huge investments. You invest money only in good instruments, but your major investment is your time, desire and skills.
This technology also attracts the attention of the professionals, who deal with selling used cars, as dealer centers. The question of removing the dents from the car spending little time and money is more than urgent for them.
The choice of the tools
Answering the question “What is the most important in working with this technology?” the professionals will say for sure that it is the level of the worker’s skills combined with the good and qualitative instrument.
The choice of the tools is a very important step. The main criteria that one should keep in mind while selecting the tools are described here.
The material
 The material from which the tools are made is very important. It reflects on the price, quality and durability of the tools. The tools can be made of ordinary steel (that normally rusts), chromed and made of rustless steel. The instrument made of ordinary steel is, of coarse, cheaper, but it won’t serve for a long time, what is more you will have to leave aside the expensive cars, and it is these cars, that are your potential customers.
The PDR tools made by Danish company HBC System are made of rustless steel that on the final stage is polished and the instruments acquires the nice and shiny look, that is preserved for many years unlike the chromed instrument that looks nice only when you buy it. HBC System produces the tools from high-carbonate steel and this instrument has been tested for hundred times by workers and also metal laboratories. HBC has the homologations from the car producers all around the world, such companies as Mercedes and Porsche already made their choice in favour of HBC System.
Quality
 Except the material the process of producing the tools is very important too. The tools produced by HBC System undergo 3 stages of heat treatment. The points of the instruments are forged and do not distort with the years of usage. Very important is that the middle part of the instrument only bends but do not twists. Because the worker works from the inside of the car he doesn’t see directly where and how hard he pushes, that is why it is so important that the tool works as the continuation of his hand and reproduces the efforts the worker makes.. When the instrument twists in the middle it is very difficult to control it, there is a danger to push too hard or at the wrong place and to spoil all the work done. If you made your mind to work with this technology start with the quality of the instrument.
Sets of instruments
While choosing the instrument one should remember that a universal kit doesn’t exist. In the process of working everyone finds his own tool, which he likes. All the PDR tools proposed by HBC System can be generally subdivided into 2 kinds: main and special. Main tools are the tools that are invented to deal with the most common types of dents and to solve the most common problems. At the same time the special tools are created to help you in more problematic cases where the main tools are not the thing you need. More description you will find in this catalogue.
Cost of the tools
Tuesday, February 21, 2012
Caravan Repair with HBC System E Step by step
Caravan Repair with HBC System E – Step by step
- Check the dent (there may not be any areas there are to high.)
- Knock down edges/kanter so the overgang/transition of the dent becomes slanting/skrå, about 45 degrees.
- Grind the damaged area until the paint is gone. You can use a wire brush.
- Clean the dent and the area were the copy is going to be taken. Clean with E-cleaner.
- Measure the dent on the plate/caravan. Check the fixed points several times.
- Fit the niveau rail by applying an appropriate layer of mouldmaker on the back of it. Make sure that the injection hole is in the centre of the damage.
- If it is upgrade: Check the fixed points and fit the niveau rail with vacuum.
- Fasten the vacuum tool. Fit the vacuum tool on top of the niveau rail.
- Check if there is space between the niveau rail and the vacuum tool. Check fixed points.
- Copy: Fill mouldmaker in the hole slowly to the edge. 2cm larger than the damaged spot. Pull up the mixing tip slowly to avoid air pocket/a hole.
- Take the vacuum tool of the plate/caravan. You can use a palette. The copy is done. Press out the air lightly.
- Forskyd/displace,place the vacuum tool/copy to the dent efter fixed points. Check the space between the niveau rail and the vacuum tool.
- Mix the støbemasse (E-filler and hardener.) ½ pipette, ½ HBC mixing jar at 20 degrees.
- Fill the injector. Make sure that there is no air in the injector.
- Cut of the prop/top of the copy. Important: Place the needle in the middle of the copy and inject the e-filler very carefully while at the same time twisting the injector/needle to avoid air in the cast.
- Remove the needle at the first sign of e-filler next to the mould. Carefully keep on filling while the needle is being removed, to fill the hole in the cast.
- If it needs more filling: Leave the needle in and fill the injector.
- The hardening time is 30 minutes at 20 degrees.
- Grind with the glass pen.
- Apply the Primer between the repair area and the plate.
- Spray carefully the area with primer and grind again. Avoid spraying too much into the middle of the repair.
- Regrind with the glass pen if necessary.
- Apply the right caravan colour. Warm up the area to 50 degrees to speed up the curing process.
- Apply fade thinner in the mat area (in the rim zone). Bruges til at fjerne sprøjtestøv. The fade thinner dries in 10 minutes, so wait and see the result before applying more fade thinner.
- After a couple of hours you can polish if needed.
Good advices:
- Clean the tools after use.
- The vacuum tools are going to be placed right after use to avoid damages on the gasket.
- Good light.
- You can use a palette or fishing line to get the copy/vacuum tool of.
- Avoid taking of the vacuum tool to fast, when you have made the copy.
- There may not be any air in the injector with e-filler.
- Mouldmaker: Leave the mixing tip on for next time. Change the mixing tip before you use it again.
- Painting with aerosol: Press or don’t. Remember to spray before use.
- Important:
Clean the plate on the caravan.
Clean the caravan tools in hot water.
Clean the plate on the caravan.
Clean the caravan tools in hot water.
Friday, January 27, 2012
Updated Colour Formulations - System B3 Aqua

We have updated our B3 Aqua Color Mixing System with a brand new updated mixing book (colour formulations)
The new pdf. file can be downloaded from our official HBC website by registered users here
If you have purchased a HBC system and would like to register please view our guide on how to register your system here
Base colours mixing system for Plastic, Leather & Vinyl
System B3 Aqua works on all flexible, hard and soft materials basecolours for mixing of plastic-, leather- and vinyl colours. Incl. colour swatch, formulas and additives. Exists as water based.
 The complete dye to match-system for all soft, hard, and flexible materials such as leather, fabric, vinyl, plastic, and glass fibre.
The standard system includes colour swatch, gloss system, mixing book, and primers, etc. All dyes and glosses gain a permanency that makes this system indispensable for service mechanics working with the repair of plastics or with maintenance jobs on furniture, cars, lorries, etc..
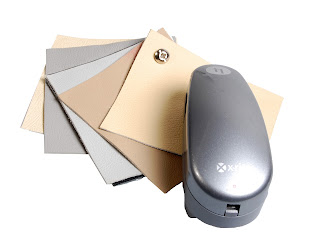
Colour matching system with additional spectrophotometer & software
download HBC's scanner information
Colour matching system with system B3 Scan is a simple process with the new developed spectrophotometer. Simply place the spectrophotometer directly on the dashboard, leather or vinyl surface and scan. A few minutes after the scan the software gives you the complete mixing receipt.
Colour Matching System
 HBC system Smarttool Production introduces an exciting solution to an age-old problem of getting the new colour to exactly and invisibly match the existing original panel.
Using sophisticated colour analysis software and professional spectrophotometer equipment we can provide the exact "recipe" to deliver perfect colour matches every time.
How does the smart repair color matching kit work?
The original leather and vinyl is "scanned" with the hand-held spectrophotometer. The resulting data is converted into an easy to follow recipe drawing on 5 of the 13 "base" B3 scan colors. The list of standard colours made by HBC system, is also available to download on www.hbc-system.com
The recipe gives the exact amount of each colour that is needed to achieve the volume required, from as little as 50ml to 5 litres per mix.
All that is needed is to measure and mix the colours thoroughly, add the right level of dulling agent (gloss adjuster) to adjust the sheen to the correct level. Now you are ready to paint the repair area.
Color matching system’s key advantages:
Exact match of every pigmented and aniline leather and vinyl
Eliminate waste of colours necessary with manual colour matching to reach the correct one
Dramatically time reducing. Gives perfect results in seconds not hours
Improve sales margin on restoration & colour matching works
Doesn’t need computer experience, user friendly software interface
Very light and portable hardware solution, ideal for mobile workers
Improve work time management, you are sure to complete the colour matching in minutes
Clean, fast and easy colour matching process
Greatly reduce necessary skill request to realize perfect colour matching
Full capable PC running standard Windows software
You can have all this functionalities in your handled device or your PC!
By using the B3 scan colour system technics you will be able to get faster and better results, saving money and getting more satisfied customers.
The B3 scan colour system is currently used by many satisfied customers and partner worldwide, providing the leather technicians, furniture producer and car interior repairer a much higher profit margin and happy customers!
B3 Aqua and B3 Scan are available in 250 ml. 1, 5, & 15 Liter bottles
The Spectrophotometer for color mixing can be ordered online on this link
The standard system includes colour swatch, gloss system, mixing book, and primers, etc. All dyes and glosses gain a permanency that makes this system indispensable for service mechanics working with the repair of plastics or with maintenance jobs on furniture, cars, lorries, etc..
Colour matching system with additional spectrophotometer & software
download HBC's scanner information
Colour matching system with system B3 Scan is a simple process with the new developed spectrophotometer. Simply place the spectrophotometer directly on the dashboard, leather or vinyl surface and scan. A few minutes after the scan the software gives you the complete mixing receipt.
Colour Matching System
 HBC system Smarttool Production introduces an exciting solution to an age-old problem of getting the new colour to exactly and invisibly match the existing original panel.
Using sophisticated colour analysis software and professional spectrophotometer equipment we can provide the exact "recipe" to deliver perfect colour matches every time.
How does the smart repair color matching kit work?
The original leather and vinyl is "scanned" with the hand-held spectrophotometer. The resulting data is converted into an easy to follow recipe drawing on 5 of the 13 "base" B3 scan colors. The list of standard colours made by HBC system, is also available to download on www.hbc-system.com
The recipe gives the exact amount of each colour that is needed to achieve the volume required, from as little as 50ml to 5 litres per mix.
All that is needed is to measure and mix the colours thoroughly, add the right level of dulling agent (gloss adjuster) to adjust the sheen to the correct level. Now you are ready to paint the repair area.
Color matching system’s key advantages:
Exact match of every pigmented and aniline leather and vinyl
Eliminate waste of colours necessary with manual colour matching to reach the correct one
Dramatically time reducing. Gives perfect results in seconds not hours
Improve sales margin on restoration & colour matching works
Doesn’t need computer experience, user friendly software interface
Very light and portable hardware solution, ideal for mobile workers
Improve work time management, you are sure to complete the colour matching in minutes
Clean, fast and easy colour matching process
Greatly reduce necessary skill request to realize perfect colour matching
Full capable PC running standard Windows software
You can have all this functionalities in your handled device or your PC!
By using the B3 scan colour system technics you will be able to get faster and better results, saving money and getting more satisfied customers.
The B3 scan colour system is currently used by many satisfied customers and partner worldwide, providing the leather technicians, furniture producer and car interior repairer a much higher profit margin and happy customers!
B3 Aqua and B3 Scan are available in 250 ml. 1, 5, & 15 Liter bottles
The Spectrophotometer for color mixing can be ordered online on this link
Balancing Powder

− a high-quality, eco-friendly product at a low price
How to use Balancing powder ®
Balancing Powder® is placed inside the tyre before this is fitted to the rim. At a speed of 30 km/t the centrifugal forces begin to take effect, whereupon the balancing powder is slung around in the tyre, and the balancing effect begins to occur. The vibrations that arise in the tyre’s contact with the roadway cause the balancing powder to move to the area of imbalance. This occurs constantly while driving, thus producing a dynamic balance.
Balancing Powder® is a brand new, dynamic and technically correct replacement for balancing weights that use lead or other metals.
It all began with aircraft safety
Balancing Powder® was originally developed in 1990 for aircraft landing wheels. It is a safe balancing technique, because the balancing powder is kept inside the tyre, thus replacing balancing weights which might fall off and damage the aircraft at take-off or landing.
Balancing Powder® has been further developed for use with buses, trucks, vans and even small cars.
Balancing Powder® is
- easy to use
- is placed inside the tyre without the use of balancing machines
- meets the future’s global environmental requirements – and the EU directive banning traditional lead balancing from 1 January 2008
- is a competitively-priced alternative to all known balancing techniques
- is hi-tech and high quality at a low price
- is the balancing powder with the highest specific gravity, thus ensuring optimum balancing – even at high speeds and in rapid turns
- is unaffected by moisture
- causes no wear on the inner liner and tyre carcase
- minimises wear and tear on tyres
- is simple to fi t and can be used with aluminium or steel rims tyres
Plastic Welding system
The best and most compleate plastic welding system from HBC system
HBC system offers this all-purpose, portable plastic welding kit for repairing tanks, tarps, liners, conveyor belts, automotive, truck, motorcycle and marine body parts as well as other thermoplastic products of all types.
 The HBC Plastic Welding kit includes everything necessary in one tool box to make a professional quality thermoplastic repairs in the field and in the shop.
The welding system from HBC system is the most profesional sytem for high end plastic welding repairs
System B6 Plastic welding kit can be ordered onlin on this link
HBC system offers this all-purpose, portable plastic welding kit for repairing tanks, tarps, liners, conveyor belts, automotive, truck, motorcycle and marine body parts as well as other thermoplastic products of all types.

The welding system from HBC system is the most profesional sytem for high end plastic welding repairs
System B6 Plastic welding kit can be ordered onlin on this link
Dashboard Repair
HBC system B1 is a system for repairs of plastic, leather & vinyl both hard and flexible as well as interior as exterior parts, bumpers, dashboards and leather & vinyl componentsSystem B1 contains a complete assortment of adhesives ranging from specially developed hotmelt with fine structure to soft, flexible, or hard bumper- adhesive for dash-boards and glass fibre boxes on
caravans and lorries.


The system is complete with cleansing fluids, primers, and reinforcement material. Included are all the required tools and adhesive materials to complete the repair from start to finish.
The system makes it possible to repair hard and flexible plastic, both interior and exterior parts, bumpers, dashboards, as well as leather and vinyl components.

System B1 mini Mostly for Dashboards can be ordered online on this link
Thursday, January 26, 2012
Leather Repair
 HBC leather repair system B

Dent removal step by step Manual system G
Manual System G
1. Introduction
Paintless dent removal is a craft, which only can be learned by following this instructional manual closely along with lots of training. Successful repairing of dents without repainting depends strongly on coordinating eye and hand. To develop this coordinating skill so that you quick and safe can remove dents, the manual must be followed and the training be done until you can carry this out correctly every time.
This manual contains eight sections:
1. Introduction
2. Tools
3. Hand tools
4. Dent terminology
5. Basic training
6. Basic dent beating out
7. Working with cars
8. Conclusion
The manual is carefully elaborated to guide you – step by step – through the procedure of beating out dents without after painting.
Some learn faster than others, so do not get impatient. Nobody has ever learned this working method overnight so be fair to your self and take the time you need.
2. Dent Removal Tools
The tools are the longer, heavier equipment in the kit. They are used for dents, which are located so that you have no access to them from the downside.
The tools are divided according to types and shapes of the working ends.
The tools are manufactured from polished or 4140 steel instead of stainless steel. Stainless steel is too soft, which makes it difficult to control the pressure during repairing of dents.
The points on the tools are developed and specified according to different properties in sheet metal. This development has taken place over a range of years to meet the need at people with great practical working experience within repairing. But people work in different ways and develop their own method of repairing; therefore we do not recommend specific which point to use at a given job.
As earlier said paintless dent removal is a craft, which relies on estimate and experience of the person doing the job. Some do almost all repair work with one type of point. Others may use two or three different points for one dent. Going through the training programme you will get the chance to try out different points and hereby gain the experience necessary in order to know every point. If you work better with one type for a certain dent, you can go ahead and use that one.
The five types of points are as follows:
Knife tool
Cutter tool
Ball tool
Blade tool
Tri-point tool
Knife tool
The bars on the knife tools bend and are shaped as a long wedge at the end. They have a sharp edge.
The knife tools are mostly used for repairing small dents – so called micro grooves – because of the dot on the end of the point. They are also useable for a certain kind of dents called ponds.
One of the best qualities of the knife tool is the way in which, it “catches” the metal. When it reaches the right spot it stays there.
Please notice that the greatest danger in using the knifepoint is, that it may scratch the metal if pushed to hard. Because scratches are the worst that can occur in repairing dents without after painting, you should be very careful in using the knife tool.
Cutter tool
The ends have two flat edges and one round top.
Billede
Cutter tools are good at finishing dents. They are very good in beating out doors and other vertical bodywork parts as they are very sharp and because they grab a hold of the metal surface.
Like the knife tool the cutter tools can also scratch the metal when pushed to hard, so please take care in using them
Ball tools
The ends are rounded in ball shape. The ball tool is a really good all-round tool.
Billede
As the ends are rounded, the ball tool behaves “softer” than the other ends. It is therefore possible to put more strength into the work. Many people think, that the ball tool is the easiest to control. It is good at removing lighter damages and small dents.
The potential danger in the ball tool lies in making an elevation – a reversed dent – and that it slips. The ball tool does not catch on to the metal so well as a knife or carving point, so you should be careful to hold the tool where you want it.
Blade tools
They have flat ends and a rounded top.
Billede
Blade tools are fine tools for all purposes, even though they are not as “soft” as ball tools.
Blade tools catches the metal pretty well from side to side, yet they have a tendency to slide back and forth; so please be careful keeping them under control.
The potential danger in the blade tool is the same as for the ball tool – to make an elevation.
Tri-point tool
The ends have 2 bendings; the point is tri-pointed with a rounded spot.
Billede
The tri-point tool is used for the work with the heavy, thick metal, which can be found on cars like Mercedes-Benz and BMW.
The tri-point tool is usually too heavy a tool for lightweight compact and semi-compact cars.
Because the tri-point tool is so stiff, it is easier to make an elevation with this tool than with the other tools, so move forward slowly, until you get in touch with the tool.
3. Hand tools
Hand tools are a shorter, thinner form of the tools, but do not underestimate them. Compared to the length, the hand tool is stronger than the other tools, so it is still relative easy to use a considerable amount of force on the dent.
The hand tool can be used either like the tools – as arms, using the side of the hole or another admission point as support – or with the point directly placed on the dent. Hand tools can first and foremost be used when working with dents close to the support of the roof, trucks and bonnet; they can, though, also sometimes be useful for doors, wings and rear skirting boards.
Even though the difference between many tools with the same type of point is the length, the tools are in some cases bended in different angles. The most usable bendings have been decided – after a long period of experience - in order to be able to reach the hardly accessible places. If it is impossible to reach a dent with the used tool, please try one of the hand tools with a different bending. You will be surprised, how easy it is to reach the dent. It may be so, that you have to try different tools before finding the right one, but eventually you will automatically find the right one immediately.
4. dent terminology
Billede fordybninger
Grooves are the most common dent and the one you most often work with. Car doors, shopping trolley, children and hail, cause the grooves.
Micro grooves are tiny. Sometimes they are a result from the dent beating out process.
Billede forhøjninger
Elevations are the opposite of grooves – they go outwards instead of inwards. Most elevations occur
when you remove a groove.
Micro elevations are tiny and occur in the dent beating out process.
Billede spidsforhøjning
A pointed elevation is nearly the worst that can happen to the bodywork. They are almost impossible to repair without repainting, even though they can be reduced.
The following dents have all occurred during beating out. Micro elevations and grooves are only a part of the work. The following dents have occurred as a result of mistakes.
Billede dam
A pond may occur when removing micro elevations. A pond is a low, flat spot that is wider than a micro groove.
billede Flade
A flat is an even, flat area on the bottom of a groove. If it were levelled with the rest of sheet metal, it would be okay but it is not. Flats occur usually when you start to work on a dent from the middle instead of from the edges.
Billede flimmer
Shimmer occurs when you have worked too much on a dent. The metal looses its flexibility and becomes stiff. This usually happens, when you have mended too many micro grooves and micro elevations, which lead to the metal crystallizing.
Most of these problem dents can be avoided by learning exactly where the tool point is, and use precisely the pressure necessary to mend the metal and remove the dent.
Therefore patience and training are so important in beating out dents without repainting.
Shimmer can also lie in clear paint, but can in many cases be helped by polishing with a grindstone grain 1500 – 2000 – 3000, along with after polishing.
5. Basic training
Before starting work on the customer’s cars you need a lot of practise. For that use you need a training bonnet.
The best place to find a bonnet is in a bodywork garage or at a car breaker. Bonnets need not have neither dents nor be in perfect condition.
It is important though, that the paint on the bonnet is in good condition. You should be able to polish the bonnet so the lamp gives good reflections. These light reflections must lead the work.
It is much easier to learn on the dark paint colours, as the dark colours show the defects better than light ones. Red, dark blue and black are all good choices.
Also in training a bonnet of light metal is easier to use than one of stronger metal. Try and find bonnets with the most possible space between the side members, as you will need the space for training.
Most likely, you need more than one bonnet before you are through. It takes a lot of practise to learn beating out of dents without repainting and most people need at least 2 bonnets, before they are ready for the customer’s car.
The only way you ever learn beating out dents without after painting, is by performing the training, which is a part of the training programme, and by keeping on training until you have learned.
FIRST TRAINING PART: Adjusting the light
This training part shows how the reflection from the lamp should look like. You must learn to adjust the light easy and quick in the right position, so that it reflects in the dent that is to be repaired. Draw a circle around the dent and adjust the light so that the reflections are within the circle before starting the work.
SECOND TRAINING PART: Reflections from the dent
In this training part you shall make some dents and then learn to find them by means of the light reflections. The different dents reflect the light in their own way. Until you automatically recognize the different ways in which, the light is reflected, you are not able to repair dents on the customers’ cars.
This is a diagram on a typical reflection of a groove:
Billede
The metal reflects the light from the pipes in a way that they look like curving around the dent.
This is a diagram on a typical reflection of an elevation:
Billede
The metal reflects the light from the pipes in a way that they look like being drawn against the dent. But these diagrams only give an assumption on the real picture.
THIRD TRAINING PART: Placing the tool point
The light shows the exact placement of tool or hand tool, and you must know this before pressing on the metal to bend it. Until you have learned this and learned it correctly, you cannot begin to repair dents.
FOURTH TRAINING PART: Circles
This training part is to develop accuracy in placing the tool point and press just so hard, that the metal moves. It is the first of three training parts, which gradually gets harder.
In this training you must make elevations in the middle of circles, which you draw on the bonnet.
FIFTH TRAINING PART: X’s
When you have gained a little accuracy in placing the tool point within a circle, you must continue with X’s. Try and place an elevation in the middle of each X.
SIXTH TRAINING PART: Points
When you can hit the middle of an X each time, you proceed to making elevations in the middle of a number of points. This is very difficult, so please do not get impatient and continue, until it can be done every time.
Most likely this will take a few days, maybe a week or more, before you have worked your way through all the training and can hit the middle of a number of points time after time. While you learn to place the tool point, you also develop the eye/hand coordination and you learn, how the tool should be handled with different strength, all at one time.
6. Basic dent beating out
Dent beating out without repainting is ways of getting the metal back in the shape it had, before the dent occurred. Sheet metal has a kind of “memory”, so what you should do is to push the metal carefully back to its original shape. As long as the metal has not been dented too long or too many times, the dent will react to your efforts.
Face of a clock method
The first impulse will probably be to take a tool with ballpoint and start to press at the middle. That is a bad idea and will probably result in a flat or division of the dent.
Instead it is advisable to use the so-called face of a clock method. Visualize the outline of a clock around the dent. The twelve o’clock is the point farthest away from you, when you shall work on the dent. When looking at the dent from above, it will resemble the drawing underneath. You are placed in the bottom of the drawing.
Billede urskive
You start by pressing at twelve o’clock, then 11, 1, 2, 10, 9, and 3. This makes the dent a little smaller. Start again at twelve o’clock, this time closer to the centre, as the dent is smaller now.
Remember to work from the outer edge of the damaged area. Do not get too fast to the centre. Stay in the upper half of the clock. It is not necessary to work on the dent’s lower half, as it automatically will follow the upper half.
Removal of grooves
First you polish the damaged baseboard. This makes it easier to se the damage. Training grooves can be made with a round hammer or the bar of a large screwdriver, protected by a couple of layers of fabric. Avoid damages over the side members. Form a circle around the damage. Start with a small dent, as you will experience, that a dent sized 10 mm will cause damage to an area sized 25 mm. Choose a tool long enough to reach the dent, without it reaching to far out of the baseboard. Let the tool slide through the “S”-hook and make sure, that you have a good working position, when the dent has been located.
REMOVE ELEVATIONS
Most elevations will be micro elevations, which have occurred by removal of grooves. It is therefore necessary also to be able to handle these. Elevations can be removed by knocking lightly on the surface. You should be very careful, so that the paint is not damaged. Protect the hammer or the mandrel with tape.
In beating out elevations, you are advised to use the same “face of a clock” method, but you need to work slowly and with careful knocks. Make sure, that the beating out is levelled with the metal and not under it. Use the light and look from all sides. Check often how the work progresses. Be careful that the angles do not get too sharp.
When you have practised on both grooves and elevations, and you feel confident in removing them, the time has come to start on cars. Only you can decide, when you are ready to begin.
7. Working with cars
It would be nice, if all dents were located on the bonnet from the training bench. But since they aren’t the time has come to move forward into the real world.
First and foremost you must know, that some dents can be taken care of immediately. Others require more experience, and then there are some dents, which probably never can be repaired perfectly.
It is important to know the characteristics of the different dents before deciding, how to handle these.
The depth and angle of the dent affects the firmness of the metal and also how difficult it will be to repair. The deeper the hole the sharper the angles, the more difficult the beating out will be.
Sharp elevations are the most difficult dents to work with, as the metal has been pushed to a peak. The sides are very steep and the metal is very stiff.
When you have gained a certain amount of experience, you will be able to diminish the sharp elevations, but that is probably not something you want to try, once you have just started.
In the beginning you will rather not take on beating out of dents on the outlines of the bodywork, as these have been punched or rolled on the factory. The process of making outlines hardens the metal and makes it very difficult to work with.
In spite of this, most dents can be fixed and you will probably find it no more difficult – but a lot more interesting- than working with training bonnets.
ACCESS
Dent located in different places on the car cause different problems and we will therefore go through these one by one. We will start with the easiest places: the bonnet, tail gate and the roof.
BONNETS
Even on the bonnet, you should not start beating out before you are absolutely sure, that you can reach the dent. The first you should do is of cause to open up the bonnet and see, what can be seen. On many cars it will be necessary to remove the insulation.
Look for dents close to the profiles on the hood. Often this area is reinforced double, and you cannot reach the bottom of the dent to do beating out with out after painting.
If the dent is above or close to a shore, you must be sure that the shore can be disengaged.
What you actually must do to disengage the shore, is to loosen the glue, which holds the shore to the metal. You need not glue again, when you have finished the work, because on the next coming hot day or the next time that the engine room is warmed up, the glue will stick the shore back on again.
If the dent is sited directly over a side member, it may be necessary to drill a hole in the side member, in order to get access to the dent. Remember to use a drill stop, and to tighten it so that it does not slide.
Exceptional, under the assumption that the dent is in the right place, the disengagement of the shore may cause the dent to pop out. As already mentioned, this happens very rarely, and you must never disengage the shore hoping that the dent pops into place.
The only exception is on the big flat dents, which some times occur, when leaning on the bonnet, the tail gate or the roof; or if you place something heavy on the car. In that case is the first thing you should do, is to try and disengage the shore.
BOOT
Tail gates can be a bigger problem than bonnets, because the curbs in the metal usually are sharp and because the tail gates have more shores.
Spoilers can also be a big problem, if the dent is too close to the bars. The bars throw a shadow and obscure part of the reflections you need at the beating out.
If the spoiler is screwed on, it is not a problem, then they can just be removed. But many spoilers are riveted on, so therefore you have to shine the light and work on the dent from at least two angles, and this takes longer.
Roof installed rails give the same problem and therefore must be solved in the same way.
ROOF
Before doing anything with the roof, you must remove the ceiling lining. It may look as if every car producer has its own way of installing the ceiling lining in the different models.
There are though some common features for all ceiling lining. It is necessary to remove sunshades, trim and ceiling light. Some ceiling linings will then fall down. Others may be glued on. You have to take one car at a time.
When the ceiling lining has been removed, the work with the roof is similar to the work on the bonnet, though now you can stand upright instead of bending over.
Sunroofs are a problem of their own. It will probably be necessary to dismantle the sunroof. Usually it is only bolted or screwed on, so it is rather easy.
But NEVER CARRY OUT THE WORK ALONE. You need somebody to hold the sunroof, while dismantling it. If you loosen the one side and the sunroof falls out, a sharp elevation, which is impossible to remove, will occur.
It is also necessary to be two people to install the sunroof again.
In some ways, mudguards, doors and skirting boards are easier, because they have vertical surfaces. Therefore many people feel that these are easier to work with.
When you beat out dents on vertical surfaces, the light must be set in a vertical position. The lamp must of cause first be moved away from the car that you work on. Then the lamp shall be swung head up over the top and lowered down slowly, until it is resting on the buttress.
Usually it will be necessary to look closely to beat out dents on vertical surfaces, but usually there are many ways in which to get to the dent.
MUDGUARD
It will always be an advantage if you can get to the dent through the headlight or the flasher. Remove the container and use the opening sides as support.
It may be necessary to go through the door hinge panel, if you can find an opening to the mudguard, but use only the hinge panel if there is no other option.
There may be cases in which, it is best to drill through the engine room. In cases where the dent is on the top of a mudguard, or if you cannot get in the other way.
If it will be necessary to drill, there must be held a reasonable distance from point weldings or rivets. Some prefer to drill frontal, just behind the dent and mend the dent with hand tools. Others prefer to continue the hole and use the side of the hole to render support to the bar or one of the large hand tools.
Whether you drill in a door, a mudguard or a panel, you should always be careful to tighten the holes with rubber bodywork stoppers, when you have finished. Use for safety’s sake always a little tightening mass on the stopper.
Do also remember, that if a dent has damaged a designer line, it may not be possible to repair 100%.
REAR END PANEL
Panels look like mudguards, except that the best access possibility is through the taillight. Sometimes the best access is through the doorpost. Look after what is behind all stoppers, and do not hesitate to remove the ventilation grill, if there is one. This can be a good starting point.
Another fine access to some dents is through the fuel filling pipe stub. It will probably be necessary to drill, so do remember to close holes afterwards with a rubber stopper. It is especially important to use adhesive in this area, as the lid often is opened and the stopper can be worn.
When the dent is located on a quarter panel, the best working method is sometimes through the boot. You can often hang a S-hook on the edge of the boot to support the bar. Please take care, that the weather strip is not damaged.
DOORS
When you beat out dents with out after painting on a door, the first you should do is to close the window.
Check out the door edges for stoppers. Remove those that are there and examine what is behind them. Some car producers, for example Honda, have original holes in the doors, so that it will be easier to repair possible minor damages occurred during delivery. If it turns out that there only is the window adjustment or similar behind the stopper, then close again and keep looking. Look for a ventilation grill and get access through that.
Every time you must work on a door, it must be secured in the working position with the door lock, before even doing anything more than removing a stopper. And especially before starting to drill. Never trust that the door stop can hold the door tight, while you work.
8. Conclusion
No matter where the dent is placed, you are going to need all that you have learned, once you decide how to get to it:
· First polish the working surface, so that the best light reflection can be obtained.
· Use the light to “read” the dent and to tell exactly, where the tool point is located, before pressing on the tool to correct the metal.
· Use the “face of a clock” method on the dent, so that the sides of the dent are bend against the centre.
· Be patient. Take the time that is necessary. In the long run, slowly is quick.
· When you remove elevations, use 10-15 small knocks instead of one hard knock.
· Be extra careful with the knife tools and the cutter tool, as they can scratch the metal. Instead use for example a hammer handle.
1. Introduction
Paintless dent removal is a craft, which only can be learned by following this instructional manual closely along with lots of training. Successful repairing of dents without repainting depends strongly on coordinating eye and hand. To develop this coordinating skill so that you quick and safe can remove dents, the manual must be followed and the training be done until you can carry this out correctly every time.
This manual contains eight sections:
1. Introduction
2. Tools
3. Hand tools
4. Dent terminology
5. Basic training
6. Basic dent beating out
7. Working with cars
8. Conclusion
The manual is carefully elaborated to guide you – step by step – through the procedure of beating out dents without after painting.
Some learn faster than others, so do not get impatient. Nobody has ever learned this working method overnight so be fair to your self and take the time you need.
2. Dent Removal Tools
The tools are the longer, heavier equipment in the kit. They are used for dents, which are located so that you have no access to them from the downside.
The tools are divided according to types and shapes of the working ends.
The tools are manufactured from polished or 4140 steel instead of stainless steel. Stainless steel is too soft, which makes it difficult to control the pressure during repairing of dents.
The points on the tools are developed and specified according to different properties in sheet metal. This development has taken place over a range of years to meet the need at people with great practical working experience within repairing. But people work in different ways and develop their own method of repairing; therefore we do not recommend specific which point to use at a given job.
As earlier said paintless dent removal is a craft, which relies on estimate and experience of the person doing the job. Some do almost all repair work with one type of point. Others may use two or three different points for one dent. Going through the training programme you will get the chance to try out different points and hereby gain the experience necessary in order to know every point. If you work better with one type for a certain dent, you can go ahead and use that one.
The five types of points are as follows:
Knife tool
Cutter tool
Ball tool
Blade tool
Tri-point tool
Knife tool
The bars on the knife tools bend and are shaped as a long wedge at the end. They have a sharp edge.
The knife tools are mostly used for repairing small dents – so called micro grooves – because of the dot on the end of the point. They are also useable for a certain kind of dents called ponds.
One of the best qualities of the knife tool is the way in which, it “catches” the metal. When it reaches the right spot it stays there.
Please notice that the greatest danger in using the knifepoint is, that it may scratch the metal if pushed to hard. Because scratches are the worst that can occur in repairing dents without after painting, you should be very careful in using the knife tool.
Cutter tool
The ends have two flat edges and one round top.
Billede
Cutter tools are good at finishing dents. They are very good in beating out doors and other vertical bodywork parts as they are very sharp and because they grab a hold of the metal surface.
Like the knife tool the cutter tools can also scratch the metal when pushed to hard, so please take care in using them
Ball tools
The ends are rounded in ball shape. The ball tool is a really good all-round tool.
Billede
As the ends are rounded, the ball tool behaves “softer” than the other ends. It is therefore possible to put more strength into the work. Many people think, that the ball tool is the easiest to control. It is good at removing lighter damages and small dents.
The potential danger in the ball tool lies in making an elevation – a reversed dent – and that it slips. The ball tool does not catch on to the metal so well as a knife or carving point, so you should be careful to hold the tool where you want it.
Blade tools
They have flat ends and a rounded top.
Billede
Blade tools are fine tools for all purposes, even though they are not as “soft” as ball tools.
Blade tools catches the metal pretty well from side to side, yet they have a tendency to slide back and forth; so please be careful keeping them under control.
The potential danger in the blade tool is the same as for the ball tool – to make an elevation.
Tri-point tool
The ends have 2 bendings; the point is tri-pointed with a rounded spot.
Billede
The tri-point tool is used for the work with the heavy, thick metal, which can be found on cars like Mercedes-Benz and BMW.
The tri-point tool is usually too heavy a tool for lightweight compact and semi-compact cars.
Because the tri-point tool is so stiff, it is easier to make an elevation with this tool than with the other tools, so move forward slowly, until you get in touch with the tool.
3. Hand tools
Hand tools are a shorter, thinner form of the tools, but do not underestimate them. Compared to the length, the hand tool is stronger than the other tools, so it is still relative easy to use a considerable amount of force on the dent.
The hand tool can be used either like the tools – as arms, using the side of the hole or another admission point as support – or with the point directly placed on the dent. Hand tools can first and foremost be used when working with dents close to the support of the roof, trucks and bonnet; they can, though, also sometimes be useful for doors, wings and rear skirting boards.
Even though the difference between many tools with the same type of point is the length, the tools are in some cases bended in different angles. The most usable bendings have been decided – after a long period of experience - in order to be able to reach the hardly accessible places. If it is impossible to reach a dent with the used tool, please try one of the hand tools with a different bending. You will be surprised, how easy it is to reach the dent. It may be so, that you have to try different tools before finding the right one, but eventually you will automatically find the right one immediately.
4. dent terminology
Billede fordybninger
Grooves are the most common dent and the one you most often work with. Car doors, shopping trolley, children and hail, cause the grooves.
Micro grooves are tiny. Sometimes they are a result from the dent beating out process.
Billede forhøjninger
Elevations are the opposite of grooves – they go outwards instead of inwards. Most elevations occur
when you remove a groove.
Micro elevations are tiny and occur in the dent beating out process.
Billede spidsforhøjning
A pointed elevation is nearly the worst that can happen to the bodywork. They are almost impossible to repair without repainting, even though they can be reduced.
The following dents have all occurred during beating out. Micro elevations and grooves are only a part of the work. The following dents have occurred as a result of mistakes.
Billede dam
A pond may occur when removing micro elevations. A pond is a low, flat spot that is wider than a micro groove.
billede Flade
A flat is an even, flat area on the bottom of a groove. If it were levelled with the rest of sheet metal, it would be okay but it is not. Flats occur usually when you start to work on a dent from the middle instead of from the edges.
Billede flimmer
Shimmer occurs when you have worked too much on a dent. The metal looses its flexibility and becomes stiff. This usually happens, when you have mended too many micro grooves and micro elevations, which lead to the metal crystallizing.
Most of these problem dents can be avoided by learning exactly where the tool point is, and use precisely the pressure necessary to mend the metal and remove the dent.
Therefore patience and training are so important in beating out dents without repainting.
Shimmer can also lie in clear paint, but can in many cases be helped by polishing with a grindstone grain 1500 – 2000 – 3000, along with after polishing.
5. Basic training
Before starting work on the customer’s cars you need a lot of practise. For that use you need a training bonnet.
The best place to find a bonnet is in a bodywork garage or at a car breaker. Bonnets need not have neither dents nor be in perfect condition.
It is important though, that the paint on the bonnet is in good condition. You should be able to polish the bonnet so the lamp gives good reflections. These light reflections must lead the work.
It is much easier to learn on the dark paint colours, as the dark colours show the defects better than light ones. Red, dark blue and black are all good choices.
Also in training a bonnet of light metal is easier to use than one of stronger metal. Try and find bonnets with the most possible space between the side members, as you will need the space for training.
Most likely, you need more than one bonnet before you are through. It takes a lot of practise to learn beating out of dents without repainting and most people need at least 2 bonnets, before they are ready for the customer’s car.
The only way you ever learn beating out dents without after painting, is by performing the training, which is a part of the training programme, and by keeping on training until you have learned.
FIRST TRAINING PART: Adjusting the light
This training part shows how the reflection from the lamp should look like. You must learn to adjust the light easy and quick in the right position, so that it reflects in the dent that is to be repaired. Draw a circle around the dent and adjust the light so that the reflections are within the circle before starting the work.
SECOND TRAINING PART: Reflections from the dent
In this training part you shall make some dents and then learn to find them by means of the light reflections. The different dents reflect the light in their own way. Until you automatically recognize the different ways in which, the light is reflected, you are not able to repair dents on the customers’ cars.
This is a diagram on a typical reflection of a groove:
Billede
The metal reflects the light from the pipes in a way that they look like curving around the dent.
This is a diagram on a typical reflection of an elevation:
Billede
The metal reflects the light from the pipes in a way that they look like being drawn against the dent. But these diagrams only give an assumption on the real picture.
THIRD TRAINING PART: Placing the tool point
The light shows the exact placement of tool or hand tool, and you must know this before pressing on the metal to bend it. Until you have learned this and learned it correctly, you cannot begin to repair dents.
FOURTH TRAINING PART: Circles
This training part is to develop accuracy in placing the tool point and press just so hard, that the metal moves. It is the first of three training parts, which gradually gets harder.
In this training you must make elevations in the middle of circles, which you draw on the bonnet.
FIFTH TRAINING PART: X’s
When you have gained a little accuracy in placing the tool point within a circle, you must continue with X’s. Try and place an elevation in the middle of each X.
SIXTH TRAINING PART: Points
When you can hit the middle of an X each time, you proceed to making elevations in the middle of a number of points. This is very difficult, so please do not get impatient and continue, until it can be done every time.
Most likely this will take a few days, maybe a week or more, before you have worked your way through all the training and can hit the middle of a number of points time after time. While you learn to place the tool point, you also develop the eye/hand coordination and you learn, how the tool should be handled with different strength, all at one time.
6. Basic dent beating out
Dent beating out without repainting is ways of getting the metal back in the shape it had, before the dent occurred. Sheet metal has a kind of “memory”, so what you should do is to push the metal carefully back to its original shape. As long as the metal has not been dented too long or too many times, the dent will react to your efforts.
Face of a clock method
The first impulse will probably be to take a tool with ballpoint and start to press at the middle. That is a bad idea and will probably result in a flat or division of the dent.
Instead it is advisable to use the so-called face of a clock method. Visualize the outline of a clock around the dent. The twelve o’clock is the point farthest away from you, when you shall work on the dent. When looking at the dent from above, it will resemble the drawing underneath. You are placed in the bottom of the drawing.
Billede urskive
You start by pressing at twelve o’clock, then 11, 1, 2, 10, 9, and 3. This makes the dent a little smaller. Start again at twelve o’clock, this time closer to the centre, as the dent is smaller now.
Remember to work from the outer edge of the damaged area. Do not get too fast to the centre. Stay in the upper half of the clock. It is not necessary to work on the dent’s lower half, as it automatically will follow the upper half.
Removal of grooves
First you polish the damaged baseboard. This makes it easier to se the damage. Training grooves can be made with a round hammer or the bar of a large screwdriver, protected by a couple of layers of fabric. Avoid damages over the side members. Form a circle around the damage. Start with a small dent, as you will experience, that a dent sized 10 mm will cause damage to an area sized 25 mm. Choose a tool long enough to reach the dent, without it reaching to far out of the baseboard. Let the tool slide through the “S”-hook and make sure, that you have a good working position, when the dent has been located.
REMOVE ELEVATIONS
Most elevations will be micro elevations, which have occurred by removal of grooves. It is therefore necessary also to be able to handle these. Elevations can be removed by knocking lightly on the surface. You should be very careful, so that the paint is not damaged. Protect the hammer or the mandrel with tape.
In beating out elevations, you are advised to use the same “face of a clock” method, but you need to work slowly and with careful knocks. Make sure, that the beating out is levelled with the metal and not under it. Use the light and look from all sides. Check often how the work progresses. Be careful that the angles do not get too sharp.
When you have practised on both grooves and elevations, and you feel confident in removing them, the time has come to start on cars. Only you can decide, when you are ready to begin.
7. Working with cars
It would be nice, if all dents were located on the bonnet from the training bench. But since they aren’t the time has come to move forward into the real world.
First and foremost you must know, that some dents can be taken care of immediately. Others require more experience, and then there are some dents, which probably never can be repaired perfectly.
It is important to know the characteristics of the different dents before deciding, how to handle these.
The depth and angle of the dent affects the firmness of the metal and also how difficult it will be to repair. The deeper the hole the sharper the angles, the more difficult the beating out will be.
Sharp elevations are the most difficult dents to work with, as the metal has been pushed to a peak. The sides are very steep and the metal is very stiff.
When you have gained a certain amount of experience, you will be able to diminish the sharp elevations, but that is probably not something you want to try, once you have just started.
In the beginning you will rather not take on beating out of dents on the outlines of the bodywork, as these have been punched or rolled on the factory. The process of making outlines hardens the metal and makes it very difficult to work with.
In spite of this, most dents can be fixed and you will probably find it no more difficult – but a lot more interesting- than working with training bonnets.
ACCESS
Dent located in different places on the car cause different problems and we will therefore go through these one by one. We will start with the easiest places: the bonnet, tail gate and the roof.
BONNETS
Even on the bonnet, you should not start beating out before you are absolutely sure, that you can reach the dent. The first you should do is of cause to open up the bonnet and see, what can be seen. On many cars it will be necessary to remove the insulation.
Look for dents close to the profiles on the hood. Often this area is reinforced double, and you cannot reach the bottom of the dent to do beating out with out after painting.
If the dent is above or close to a shore, you must be sure that the shore can be disengaged.
What you actually must do to disengage the shore, is to loosen the glue, which holds the shore to the metal. You need not glue again, when you have finished the work, because on the next coming hot day or the next time that the engine room is warmed up, the glue will stick the shore back on again.
If the dent is sited directly over a side member, it may be necessary to drill a hole in the side member, in order to get access to the dent. Remember to use a drill stop, and to tighten it so that it does not slide.
Exceptional, under the assumption that the dent is in the right place, the disengagement of the shore may cause the dent to pop out. As already mentioned, this happens very rarely, and you must never disengage the shore hoping that the dent pops into place.
The only exception is on the big flat dents, which some times occur, when leaning on the bonnet, the tail gate or the roof; or if you place something heavy on the car. In that case is the first thing you should do, is to try and disengage the shore.
BOOT
Tail gates can be a bigger problem than bonnets, because the curbs in the metal usually are sharp and because the tail gates have more shores.
Spoilers can also be a big problem, if the dent is too close to the bars. The bars throw a shadow and obscure part of the reflections you need at the beating out.
If the spoiler is screwed on, it is not a problem, then they can just be removed. But many spoilers are riveted on, so therefore you have to shine the light and work on the dent from at least two angles, and this takes longer.
Roof installed rails give the same problem and therefore must be solved in the same way.
ROOF
Before doing anything with the roof, you must remove the ceiling lining. It may look as if every car producer has its own way of installing the ceiling lining in the different models.
There are though some common features for all ceiling lining. It is necessary to remove sunshades, trim and ceiling light. Some ceiling linings will then fall down. Others may be glued on. You have to take one car at a time.
When the ceiling lining has been removed, the work with the roof is similar to the work on the bonnet, though now you can stand upright instead of bending over.
Sunroofs are a problem of their own. It will probably be necessary to dismantle the sunroof. Usually it is only bolted or screwed on, so it is rather easy.
But NEVER CARRY OUT THE WORK ALONE. You need somebody to hold the sunroof, while dismantling it. If you loosen the one side and the sunroof falls out, a sharp elevation, which is impossible to remove, will occur.
It is also necessary to be two people to install the sunroof again.
In some ways, mudguards, doors and skirting boards are easier, because they have vertical surfaces. Therefore many people feel that these are easier to work with.
When you beat out dents on vertical surfaces, the light must be set in a vertical position. The lamp must of cause first be moved away from the car that you work on. Then the lamp shall be swung head up over the top and lowered down slowly, until it is resting on the buttress.
Usually it will be necessary to look closely to beat out dents on vertical surfaces, but usually there are many ways in which to get to the dent.
MUDGUARD
It will always be an advantage if you can get to the dent through the headlight or the flasher. Remove the container and use the opening sides as support.
It may be necessary to go through the door hinge panel, if you can find an opening to the mudguard, but use only the hinge panel if there is no other option.
There may be cases in which, it is best to drill through the engine room. In cases where the dent is on the top of a mudguard, or if you cannot get in the other way.
If it will be necessary to drill, there must be held a reasonable distance from point weldings or rivets. Some prefer to drill frontal, just behind the dent and mend the dent with hand tools. Others prefer to continue the hole and use the side of the hole to render support to the bar or one of the large hand tools.
Whether you drill in a door, a mudguard or a panel, you should always be careful to tighten the holes with rubber bodywork stoppers, when you have finished. Use for safety’s sake always a little tightening mass on the stopper.
Do also remember, that if a dent has damaged a designer line, it may not be possible to repair 100%.
REAR END PANEL
Panels look like mudguards, except that the best access possibility is through the taillight. Sometimes the best access is through the doorpost. Look after what is behind all stoppers, and do not hesitate to remove the ventilation grill, if there is one. This can be a good starting point.
Another fine access to some dents is through the fuel filling pipe stub. It will probably be necessary to drill, so do remember to close holes afterwards with a rubber stopper. It is especially important to use adhesive in this area, as the lid often is opened and the stopper can be worn.
When the dent is located on a quarter panel, the best working method is sometimes through the boot. You can often hang a S-hook on the edge of the boot to support the bar. Please take care, that the weather strip is not damaged.
DOORS
When you beat out dents with out after painting on a door, the first you should do is to close the window.
Check out the door edges for stoppers. Remove those that are there and examine what is behind them. Some car producers, for example Honda, have original holes in the doors, so that it will be easier to repair possible minor damages occurred during delivery. If it turns out that there only is the window adjustment or similar behind the stopper, then close again and keep looking. Look for a ventilation grill and get access through that.
Every time you must work on a door, it must be secured in the working position with the door lock, before even doing anything more than removing a stopper. And especially before starting to drill. Never trust that the door stop can hold the door tight, while you work.
8. Conclusion
No matter where the dent is placed, you are going to need all that you have learned, once you decide how to get to it:
· First polish the working surface, so that the best light reflection can be obtained.
· Use the light to “read” the dent and to tell exactly, where the tool point is located, before pressing on the tool to correct the metal.
· Use the “face of a clock” method on the dent, so that the sides of the dent are bend against the centre.
· Be patient. Take the time that is necessary. In the long run, slowly is quick.
· When you remove elevations, use 10-15 small knocks instead of one hard knock.
· Be extra careful with the knife tools and the cutter tool, as they can scratch the metal. Instead use for example a hammer handle.
Order Procedure
The HBC products are marketed through local national HBC partners, who act as marketing, and distribution channels for systems, consumables, technical training, and marketing. Being IATA certificated, HBC system is also allowed to ship dangerous goods across the world.
If you are intersted in buying our systems please contact us to get an offer or find out if there is a local distributor in your area.
Your HBC contact persons are as mentioned below and can be contacted via:
Email: info@hbc-system.com
Manager of finance Vibeke Jorgensen (Orders, invoices etc.)
Sales Assistant Cecilia Brun Jensen (Shipping, claims (orders)
Marketing Manager Jan Hovgaard (web, print, marketing materials)
Key Account Manager Mette Andersen (Prices and PA to Henrik Bro)
Senior Training Manager John Speet (Technical support)
If you are intersted in buying our systems please contact us to get an offer or find out if there is a local distributor in your area.
Your HBC contact persons are as mentioned below and can be contacted via:
Email: info@hbc-system.com
Phone: +4570227070
Please address your request to the person responsible:
President/CEO Henrik Bro Christensen
Manager of finance Vibeke Jorgensen (Orders, invoices etc.)
Sales Assistant Cecilia Brun Jensen (Shipping, claims (orders)
Marketing Manager Jan Hovgaard (web, print, marketing materials)
Key Account Manager Mette Andersen (Prices and PA to Henrik Bro)
Senior Training Manager John Speet (Technical support)
HBC System E complete; Caravan repair training
HBC System E complete; Caravan repair
According to insurance companies about 60% of all damaged side panels of caravans and mobile homes can be repaired instead of replaced. The savings by repairing instead of replacing this side panel can be more than 70%, not even mentioning the problems of moisture after replacing the side panels. The patented repair method of HBC system E, which creates a structure copy of the original pattern and uses an unique injection method of the filler, allows you to do repairs up to 3 meters! The repair of the damage must be conducted in a professional way. The 2 days Caravan training will be sufficient to give you a solid basis to do the repair in a professional way.

PurposeAt the end of this course you will be able to repair structured panels on caravans and mobile homes.
Intented for:
(Employees of) bodyshops, caravan – mobile home repair companies, caravan – mobile home dealers, caravan – mobile home rental companies, etc.
Process The course is divided into a theoretical and practical part. Each participant will have the opportunity to practise the repair methodes on various materials and structures. It is possible during the training to work with the repair kit, you use in your company. This implies of course that you bring this repair kit to the course.
Test
At the end of the course you will have to pass a test. This test is a practical test, where you will have to do a repair on a caravan - mobile home panel.
Certificate
When you passed the test positively you will receive a certificate.
Duration:
1-2 days
Program
· Introduction of HBC system E; caravan repair
· Explanation internet; where to find manuals, step-by-step charts, video, order forms, etc.
· Explanation of the tools in the system
· Explanation of the consumables in the system
· Run video HBC system DVD
· Theory about the usage of the tools in the system
· Theory about the repeating structure; fine, coarse and flat panels
· Theory about the repair of holes in caravan panels
· Theory about the making of the mould, filling of the dent and painting the damage
· Demonstration of the caravan repair system
· Exercises with the caravan repair system
· Selecting the right colour, using the colour selector
· Explanation of HBC system caravan spotrepair
· Explanation of the software with Mixing Formulas
· Mixing the colour, using the software
· Colouring the repair
· Tips and tricks, how-to-sell
· Test
· Evaluation
Needed systems· HBC System E complete
· HBC system Caravan spotrepair
· Sanding paper P240-P400-P1200-Scotch brite (grey)
· Clean cloths
· Compressor
· Heat gun
Needed training material
· Caravan panels with structure
http://www.hbc-system.com/Dent-repair-system-for-caravans-5163.aspx

Leather care system
The leather care kit from HBC system maintains the original, natural non-shiny leather sheen
This unique leather care system provides your with an original, natural satin sheen leather surface without leaving a greasy film residue. Slipping around at the leather seat is history - the leather protection cream leaves a mat non-greasy finish. The leather care products are suitable for leather seats, dashboards, stearing wheels etc.
The professional high performance leather care kit contains:

HBC INK REMOVER, STICK
Part no. 00.939, 20g
HBC Ink Remover eliminates stains and pen marks, ink and lipstick from pigmented leather. Do not use on nubuck, suede or aniline leather.
Instructions for use:
 HBC LEATHER CLEANER, STRONG
Part no. 00.942, 250ml.
HBC Leather Cleaner, strong contains a highly effective detergent for cleaning pigmented leather upholstery like car, motorcycle, boat, airplane and sofa seats. It can also be used on other resistant leather articles like shoes and handbags. It is not suitable for aniline leathers, nubuck or suede. If you have a delicate skin or if you use frequently HBC Leather Cleaner, strong, please wear latex gloves while using the product.
Instructions for use:
 HBC LEATHER GUARD (LEATHER PROTECTION CREAM) Part no. 00.941, 250ml.
HBC Leather Guard is a water based protection cream for all leather types, except nubuck and suede. HBC Leather Guard protects against oil, water and alcohol based stains as well as everyday dirt and grime. It will also keep your leather lovely and soft, and when used regularly prevents pigmented leather from cracking.
 HBC STAIN REMOVER
Part no. 00.942, 250ml.
HBC Stain remover removes resistant stains from leather and PVC. Do not use on aniline, nubuck or suede. Use this product with caution.
Instructions for use:
The Leather Care System can be ordered here

HBC INK REMOVER, STICK
Part no. 00.939, 20g
HBC Ink Remover eliminates stains and pen marks, ink and lipstick from pigmented leather. Do not use on nubuck, suede or aniline leather.
Instructions for use:
- Remove the screw cap and push up the tip about 4 mm out of the tube, unscrewing it.
- Pre-test on a concealed area.
- Pass the HBC Ink Remover stick repeatedly over the point to be cleaned, pressing gently.
- Let the product work on the stain for about 30 seconds.
- Wipe off HBC Ink Remover with a soft dry cloth.
- Clean with Leather Cleaner.
- Apply HBC Leather Guard, rubbing the leather gently with circular movements, then let it dry.
 HBC LEATHER CLEANER, STRONG
Part no. 00.942, 250ml.
HBC Leather Cleaner, strong contains a highly effective detergent for cleaning pigmented leather upholstery like car, motorcycle, boat, airplane and sofa seats. It can also be used on other resistant leather articles like shoes and handbags. It is not suitable for aniline leathers, nubuck or suede. If you have a delicate skin or if you use frequently HBC Leather Cleaner, strong, please wear latex gloves while using the product.
- Shake the bottle well before using.
- Pre-test the colorfastness on a hidden area.
- Put HBC Leather Cleaner, strong onto a soft sponge and produce foam by squeezing it repeatedly.
- Clean the area without rubbing.
- Wipe the excess foam and the soiling away with a soft white cotton cloth.
- Dry with a dry cloth and let dry fully.
 HBC LEATHER GUARD (LEATHER PROTECTION CREAM) Part no. 00.941, 250ml.
HBC Leather Guard is a water based protection cream for all leather types, except nubuck and suede. HBC Leather Guard protects against oil, water and alcohol based stains as well as everyday dirt and grime. It will also keep your leather lovely and soft, and when used regularly prevents pigmented leather from cracking.
We recommend your leather is cleaned and re-protected at least every six months. Aniline leather placed in rooms subject to heavier use may need cleaning more regularly and more thoroughly.
Instructions for use:
- Shake the bottle well before use.
- Pre-test on a concealed area.
- Put a small amount of HBC Leather Guard onto a soft, clean cloth and apply to the surface of the leather evenly. Repeat on areas subject to heavy use.
- Leave about 30 minutes to dry.
- Buff the leather lightly with a clean soft cloth.
Part no. 00.942, 250ml.
HBC Stain remover removes resistant stains from leather and PVC. Do not use on aniline, nubuck or suede. Use this product with caution.
Instructions for use:
- Apply a little HBC Stain remover on a clean cloth.
- Test the colour resistance of the leather on a hidden spot.
- Rub lightly on the leather to see if there is no colour transfer onto the cloth.
- If this test is OK, rub lightly with the cloth over the stained area.
- If needed, treat the stained area once more, checking regularly that no colour is transferred onto the cloth.
- Clean the treated area with HBC Leather Cleaner.
- Let dry and apply HBC Leather Guard
The Leather Care System can be ordered here
Slide hammer system – Step by step repair manual
Slide hammer system – Step by step repair manual
· Clean the repair area on the car with cleaner.
· Start the glue melting heat gun part no. 13.977 (ready after 2 minutes)
· To choose the right hot melt glue sticks:
Part no. Colour Temperature
o 13.975 Yellow 12-25 degrees, lower temperature.
o 13.976 Blue 15-40 degrees.
o 13.979 Black 12-25 degrees, lower temperature
*Right glue sticks depending of the humanity and temperature.
· The air humanity can make it difficult to advice exact temperature for the glue sticks.
· Place the Glue stick in the started heat gun.
· Pickup the right red Plastic top
o (small, medium, large).
o Best success if the plastic top and dent are similar size.
· Ad the melted glue on the plastic top -then fast place the plastic top in the central area of the dent.
o Place the plastic top in the deepest area of the dent
o Make sure the plastic top is stable and 90 degrees on the repair area.
- · Wait 3-4 minutes. The glue has to be cold.
- · Place the Slide hammer in the top set and pull the dent up in right level with small steps.
- · Remove the glue with Glue Remover
- · Polish the repair after finishing.
Important:
· Repeat the repair process if needed.
· If the dent by an accident is too high knock down the top with a nylon tip.
· The temperature and the air humanity make the glue stick works differently.
Accessories to slide hammer system
13.990 Slide hammer
14.009 Glue remover 100ml.
13.975 Glue sticks yellow 15pcs.
13.976 Glue sticks blue 15pcs.
13.979 Glue sticks black 15pcs.
446-447-448 Knock down punch
13.991 Rubber hammer
14.003 Blue Tips plastic set Alu tips
14.0031 Round 16mm. 1405 Round 15mm
14.0032 Round 20mm. 1406 Round 20mm
14.0033 Round 32mm. 1407 Round 25mm
14.0034 Round 40mm. 1408 Round 30mm
14.0035 Oval 50x30mm.
13.974 TIDY Tips plastic set 14.002 Orange thin soft plastic set
Round 15mm. 14.0021 Round 30mm.
Round 20mm. 14.0022 Round 40mm.
Round 25mm. 14.0023 Oval 50x30mm.
Ozone air cleaning manual
HBC System H - Car cleaner User manual
Following has to be considered before using
· Be sure that no persons or pets are in the car
· Be sure that the smelling source is removed
· Be sure that the car is standing in a well ventilated room or standing outside.
1. Place the machine in the centre of the cabin on a plain support.
2. Open one window approximately 3 cm
3. Start the fan in the car Without engine running
4. Connect the machine to the power supply
5. Adjust the timer between 0 – 60 minute (Normal 30 minute )
6. Close doors
7. Turn on the machine
8. Wait for the adjusted minutes
9. Turn off the fan in the car
10. Open doors and let the car be ventilated for 10 minutes or more
11. Now your car is odour free inside and the fan system is sterilised.
If the car is still not odour free because of the load of bad smelling you have to make one more treatment and follow point 1 – 11 again.
Now you can enjoy a clean fresh and sterilised car without the danger of infection from germs.
HBC system hope you will find this product satisfactory.
Headlight Repair System manual
Date of revision : 25-09-2011
Product trade name(s) Headlight Repair System
Product group : D
Part number(s) : 00.609
Expire date : Storage life: 6 months
Content :
Part no. 00.609-1: 250 ml clearcoat
Part no. 00.609-2: 125 ml activator
Part no. 00.609-3: 125 ml catalyst
Abrasives: P400 (2 discs ø75mm),
P600 (4 sky blue sheets 130x85 mm),
P800 4 Lemon sheets 130x85 mm),
P1500 (4 orange sheets 130x85 mm),
Polishing cloth
Typical Properties
Color / Grade of Gloss Transparent and colourless
Characteristics
Special three-component finish with excellent characteristics of resistance and adherence to polycarbonate- base plastic materials, such as lenses for vehicle lights, synthetic glazing ( as long as it is made of polycarbonate), yacht components made of transparent plastic and so on, with excellent properties of expansion and UV protection of the underlying polycarbonate surface.
Although they guarantee good adhesion to the polycarbonate, the raw materials used do not prejudice the polycarbonate´s mechanical resistance (cracking), but protect it from the otherwise inevitable yellowing followed by decay caused by the powdering of the original UV protection that takes place on average in the course of the first five years of its working life.
Combined with the innovative sanding system, the special three- component formula enables plastics that have been deeply scoured or scratched to be repaired, as long as they are not actually broken.
The headlight reapir system from HBC Smart Repairs offer a fast and easy way to restore the clarity to headlight lenses that have become dull over time, at a fraction of the cost of replacement.
Step by step repair
1. Applying
2. Cleaning
3. Sanding in 3 steps;
remove the complete UV protection
1. Cleaning
2. Mix clear coat
3. Apply 2 layers UV Clear coat
4. Curing 15 min by IR drylamp
5. If needed remove dust or imperfections and polish
Surface Preparation :
> Sand while dry with:
Sky blue (P600) – Lemon (800) – Orange (1500)
It is important that you remove the old protection film from the headlight completely.
For particularly hard surfaces or to remove deep scratches, we recommend that you start sanding with a 320/400 grain, using ø 75 mm discs mounted on a sanding machine.
Mixture (% by weight):
Clear: 100%
Catalyst: 50%
Activator: 50%
> Mix well and filter before using (125 microns)
POT LIFE : 2 hours at 20°C
Application of UV coat:
Coats: 1 + 1 (wait 30 sec. betwee the 2 coats)
Thickness: 30 – 40 microns, dry film
Drying:
In the spray booth at 60 – 70°C: 30 min
Short wave I.R.: 10 - 15 min
INFRA SPOT 1300: 15’ at a distance of 50 – 60 cm
Max. Temp.: 70°- 80°.
Can be dried using a variety of methods: In the spray booth, with an IR lamp or in the air.
Monday, January 23, 2012
Customer registration
Manuals, step by step guidance etc. is available for download at our web. However, in order to get access to the customer pages, you’ll have to get registered. It’s simple and easy; just follow the guidance below:
To get registered please click at the following link:
- http://www.hbc-system.com/Registration-5155.aspx
- Fill out the fields (Name, email etc)
- Tick off the system(s) you’ve purchased (This is important – if you don’t tick off you will not be granted access)
- Click at “Register account”
- A message is popping up: Please check your mailbox
- Go to your mailbox and find the confirmation mail ” Smart Repair Tools account registration” from info@hbc-system.com (it might be necessary to check in your mailbox unwanted mails/ Spam mails)
- Click at the highlighted link Approve account. (This is a security to avoid unforeseen access to the website).
- After you have clicked at the hyperlink Approve account your registration is completed. Please keep your login data for future use.
You are now ready to explore the world of HBC Smart Repair !!
Headlight Repair System
 Many vehicles on the road today have yellowed and cloudy headlights due to UV light damage as well as wear and tear from weather and road debris. This results in not only poor vehicle appearance and reduced reselling value but it also compromises safety. The headlight repair system from HBC Smart Repairs offer a fast and easy way to restore the clarity to headlight lenses that have become dull over time, at a fraction of the cost of replacement.
Please read more about the new system in this leaflet:
Headlight Repair System
Consisting of a special three-component finish with excellent characteristics of resistance and adherence to polycarbonate-base plastic materials.
The raw materials used do not prejudice the polycarbonate’s mechanical resistance (cracking), but protect it from the otherwise inevitable yellowing.

Combined with the innovative sanding system, the special three-component formula enables plastics that have been deeply scoured or scratched to be restored to former, as long as they are not actually broken.
Headlight Repair system can be ordered online on this link
Saturday, January 21, 2012
Leather Scanner Demonstration
Base colours mixing system for Plastic, Leather & Vinyl Painting System
- soft, hard, and flexible materials
System B3 Aqua works on all flexible, hard and soft materials basecolours for mixing of plastic-, leather- and vinyl colours. Incl. colour swatch, formulas and additives.
Exists as water based. The complete dye to match-system for all soft, hard, and flexible materials such as leather, fabric, vinyl, plastic, and glass fibre. The standard system includes colour swatch, gloss system, mixing book, and primers, etc. All dyes and glosses gain a permanency that makes this system indispensable for service mechanics working with the repair of plastics or with maintenance jobs on furniture, cars, lorries, etc.

Colour matching system with additional spectrophotometer & software
download HBC's scanner information